
Annnnnd, we’re back! I apologize for the brief delay on posting Part Two. With four kids at home, sometimes my best laid plans go a little sideways! Anyways, I’m excited to share the second part of our crochet-a-long to turn our bitty buddy into a little lamb! If you are just joining, you can find the materials list posted here and part one posted here. If you prefer having a printable pdf pattern, you can find the bitty lamb pattern on Etsy or Ravelry (psst…it’s on sale!). Don’t forget! I’d love for you to share your work and progress on Facebook or Instagram using #bittybuddyCAL and tagging me @_stuckonyoucrochet_ !
Alright, moving on to the good stuff. Today we are going to make the head and the ears of our lamb and then assemble everything together. The head is worked from the front of the muzzle to the back of the head (no sew…woohoo!). The head has bobbles on the back half to make it look more like a lamb so pay attention to the placement and stitch count to get your bobbles lined up correctly! The ears are worked separately and will have to be sewn to the head, but hey at least they are teeny! Here’s my progress from part one and part two, all bunched up in a pretty little bowl! If you missed it, I am using Big Twist Baby Bear from Joann’s this weekend and I love it! Extra soft and squishy 🙂

Alright, moving on to the pattern. Remember, if you need help with bobbles, you can check out the “special stitches” section and the video linked in part one! If the bobbles on your lamb head seem too bulky, you can making them a little smaller by making a 3 dc (double crochet) bobble rather than a 4 dc bobble. This just means you will yarn over one less time! Always feel free to reach out to me if you have any questions!
STITCH ABBREVIATIONS:

PATTERN:
MAKING THE EARS (MAKE TWO)
*For the ears of the lamb, grab your 2.75 mm (C) hook if you are using worsted weight yarn or your 4.0 mm (G) hook if you are using bulky weight yarn! The ears are meant to be pretty large and floppy along the sides of the head. However, if you find that your ears are too large, you can size down on hook size to make them a little smaller!
To make the ears, you will start by making the inside of the ear in your accessory color. You will repeat the pattern to make the outside of the ear in your main color. Do not cut yarn after finishing your outer ear as you will immediately move on to joining the inner and outer ears together. You will repeat this twice in order to create two ears for your lamb.
Row 1: To begin, ch 3. Working in the second ch from your hook, sc x 2 across. Ch 1 and turn. [2]
Row 2: [inc] in each st. Ch 1 and turn. [4]
Row 3: inc, sc, sc, inc. Ch 1 and turn. [6]
Rows 4-7: sc x 6 across. Ch 1 and turn. [6]
Row 8: dec, sc, sc, dec [4]
For inner ear (in accessory color), cut yarn, tie off and weave in ends.
For outer ear (main color), do not cut yarn. Move to joining instructions.
JOINING THE INNER AND OUTER EAR
To join the inner and outer ears, place your inner ear on top of your outer ear. Ch 1 with the working yarn of your outer ear. You will now sc through both pieces, thus joining them together as you go around. I like to put two sc in each of the corners along the top. I place about 22 sc stitches after going around.
Sc completely around the entire ear. Sl st to first sc. Ch 1. Fold ear in half and sc 2-3 stitches across the top, joining the top of the ear together so it stays folded. Leaving a tail for sewing, cut yarn and tie off.
Need more help figuring out how to make your ear? See my video tutorial.
MAKING THE HEAD
*For the head of the lamb, you’ll use a 4.0 mm hook if you are using worsted weight yarn and a 5.0 mm hook if you are using bulky weight yarn. However, if you have loose tension, you may wish to use a 3.75 mm // 4.5 mm hook for head. The head will be the only part of the bitty buddy that is stuffed, so you’ll want to make sure the stitches are nice and tight!
Round 1: Start with your accessory color for the face of the lamb. To begin, make a magic circle. Place 6 sc in the magic circle. [6] Do not join. You will continue to work in the round.
Round 2: [inc] in each st around. [12]
Round 3: [inc, sc] x 6 around. [18]
Rounds 4-7: sc x 18 around. [18]
Round 8: [inc, sc x 2] x 6 around. [24]
Round 9: [inc, sc x 3] x 6 around. [30]
Round 10: [inc, sc x 14] x 2 [32]
Switch to your main color for the head of the lamb.
Round 11: sc x 32 in the front loop only (FLO) around. [32]
Round 12: sc x 32 in the back loop only (BLO) around. [32]
Round 13: sc x 2, bobble, [sc x 3, bobble] x 7, sc [32, 8 bobbles]
Round 14: sc x 32 around. [32]
Round 15: [bobble, sc x 3] x 8 [32, 8 bobbles]
Round 16: [dec, sc x 2] x 8 around. [24]
*Stop here and begin stuffing head firmly. Add a rattle insert, if desired, as you work towards closing up the head. If you are using safety eyes, add them now. If you’d like to add the facial features before closing the head, scroll down to facial features and add them now.
Round 17: sc, [bobble, sc x 2] x 7, bobble, sc [24, 8 bobbles]
Round 18: [dec, sc x 2] x 6 around [18]
Round 19: [dec, sc] x 6 around. [12]
Round 20:[dec] in each st around. [6]
Leaving a bit of a tail, cut and tie off your yarn. Thread a needle and sew under the front loop of each remaining stitch. Cinch tightly together to close the head. Tie off and weave in your ends.
ADDING THE FEATURES
There are many options for the eyes of the bitty buddies. You can use safety eyes or embroider the eyes in a number of different fashions. I prefer to embroider the eyes since I typically make rattles that are meant for teething babies! The eyes can be embroidered in a v-shape, right side up or upside down. Or you can embroider around the stitches to make a true eye shape. Embroidery is something that I have been working on to improve. It requires some patience at times, but I do love when I can get the look just right (and have two eyes that actually look like each other!).
Embroider the eyes (or place safety eyes) at row 9 (one row from the color change to the head). I usually make a simple upside-down V stitch across the row and leave 4-5 stitches in between the eyes. If you feel like the eyes are set too far apart, you can use a strand of the accessory color yarn and pull the sides of the face together to shape the muzzle a little better. This is a technique used in many of my bobble buddies to help give some definition to the face shape!
To make your nose, use embroidery thread to make a “Y.” The bottom of the “V” of your nose will start in the center of the magic circle. The top of the “V” of your nose will be in row 1, one or two stitches wide across the top.
Push your needle up through the center of the magic circle and pull across diagonally up a row or two to the side of the nose. Insert the needle back into the head. Leaving one or two stitches in between, pull straight across to the other side of the nose and push the needle up. Then, pull across diagonally back to the bottom stitch. Insert the hook back into the head and this should create a V shape. You will create the bottom of the “Y” by pushing the needle up through a stitch in row 2 (below the bottom of the v) and then pull up to re-insert through the middle of your magic circle and back to the bottom of the “V.” Tie off and cut yarn. (Don’t worry…if this makes no sense, there is a video linked below!)
To add the ears, I recommend using pins to ensure placement before stitching them to the head. It can be a little tricky to add the ears around the bobbles, so just do your best! I add my ears in line with the eyes and angle slightly up across the bobbles of the head. Tie off, cut yarn and weave ends.
Need more help? Check out my YouTube video for instruction on adding features here.

ASSEMBLY OF YOUR BITTY BUDDY
On to assembly (hooray!). You should now have the body with two attached arms from part one and the head with facial features completed. Next, you’ll attach the body to the head. You will use the yarn tail from the neck of the body to sew to the head. I highly recommend using pins to make sure that your head is sewn on straight and centered to the body. Place the pins up through the neck of the body into the head to hold everything in place and make sure it is all centered correctly. The nose should be centered between the arms. I like to start at the back of the body/head and move around the front. Carefully stitch through the body and head to attach. Sometimes, I will stitch around the head twice just to make sure it is extra secure!
If you need help with attaching the head, check out my YouTube tutorial.

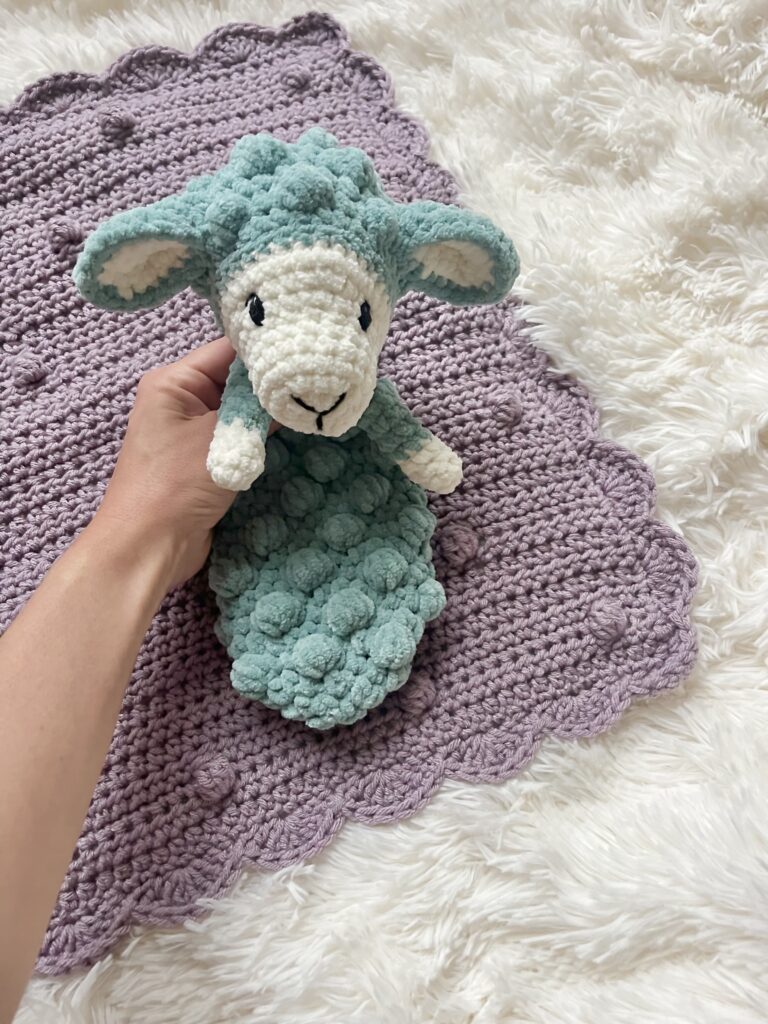
Alright, that should be it! Your bitty lamb is all finished up and ready for some sweet snuggles. I love how mine came together with Baby Bear yarn but I still love them just as much in the thinner cotton yarn! If you want, you can consider adding a teether ring or a chain to the head of the bitty buddy to turn it into a binky buddy. My daughter used to love these when she was little! These options are included in the pdf pattern for the bitties. I hope you enjoyed following along with this project. Remember, these parts will remain on the blog through next Sunday, April 28th if you need more time to finish!
I love sharing these bitty patterns and seeing what everyone comes up with! I promise new ones are in the works, so hopefully I’ll be able to share a whole new group soon! Follow along on Facebook or Instagram to see the latest progress on the bitty crew. Thanks for being here!