Beginner Coaster Pattern
Today, we will be learning how to make a beginner coaster pattern from scratch. This one-skein project uses a large crochet hook, beginner yarn and repetitive stitches to make it an easy beginner project! You’ll have the option of making a ‘mug-rug’ with fringe edging OR making a clean-edged square coaster.
For our tutorial and beginner coaster pattern, we’ll use a 6 mm hook like the ones found here. For yarn, I’ll be using Hobby Lobby’s Beginner Bee yarn found here. Bernat Maker yarn, found here, is also a good alternative.
Are you left-handed? Click HERE to download the left-handed pattern
with step-by-step photos! (coming soon!)

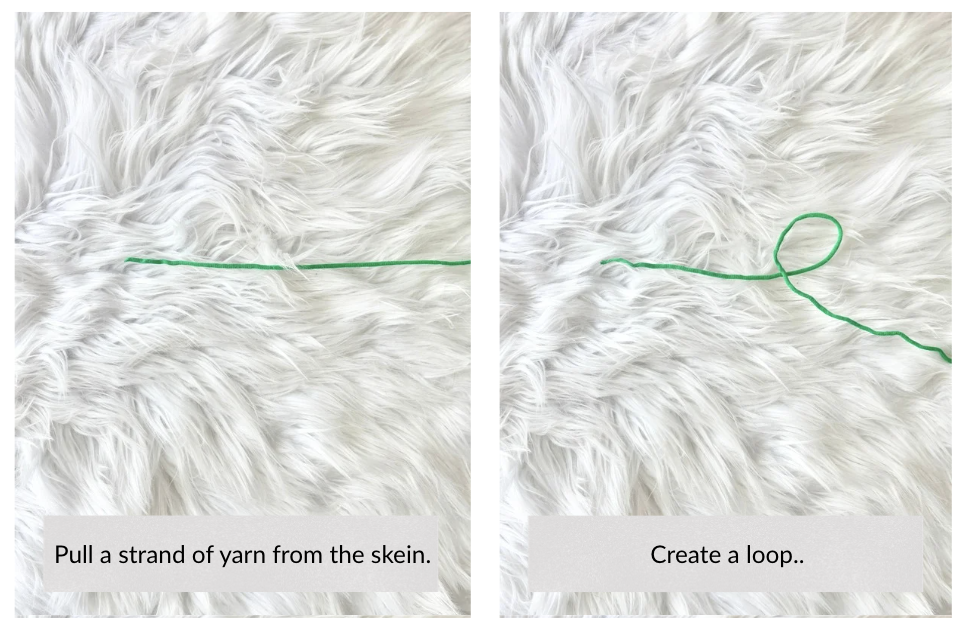
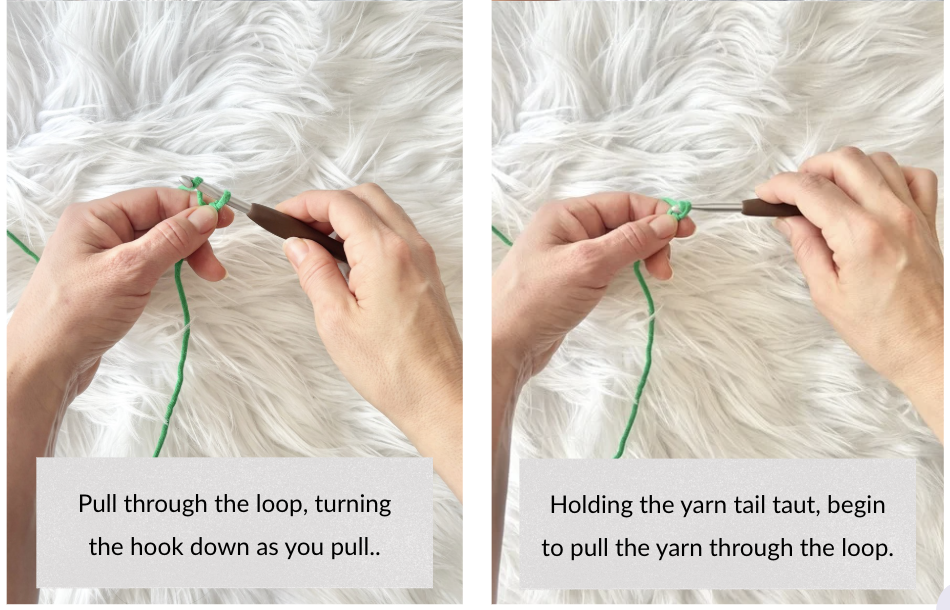
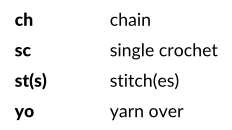
MAKING A SLIP KNOT
For our project, we will be working back and forth in rows. There are two ways to work a crochet project – either in rows creating a flat project (think blankets, washcloths, scarves, etc) OR in the round creating a circular or 3-dimensional project. This tutorial will not review working in the round, but stay tuned for Part 2 which will review making a magic circle and working in the round!
When working in rows, the slip knot is the first step to be able to take the yarn from the skein to getting started on your crochet hook. Check out the steps in the photo tutorial below OR view the full video link below.


WORKING THE CHAIN
Once you’ve created the slip knot, you’ll need to work the beginning chain to get started on your crochet project. For most patterns using single crochet stitch, you will need to work one chain more than the number of single crochet stitches used in row of the pattern.
For our coaster pattern, we will be using 15 single crochet stitches. This means we need to start with 16 chains. If you are working a different pattern, your beginning chain count may vary.


SINGLE CROCHET STITCH
Once you’ve worked the chain, you’ll work back across the chain (from right to left) placing a single crochet stitch in each chain space.
If your chains seem too tight to allow the hook back into the space, you’ll want to pull your chain out and try again using looser tension. Alternatively, if your chains seem very loose and uneven, you’ll want to pull your chain out and try again using slightly tighter tension. Having uniformity in the chain will help to keep your single crochet stitches even.
Turn to work across the chain. Working in the second chain from the hook, follow the steps below to work the single crochet stitch.


THE BEGINNER CROCHET COASTER PATTERN
You’ve made it through all of the tutorial steps, so let’s get to actually making something! Follow the steps below to make your very own beginner crochet coaster! You’ll be able to choose if you’d like to design a ‘mug-rug’ with fringe on the edges OR a clean-edge, square coaster. You should be able to make a few coasters from one skein of yarn!

MATERIALS:
HOOK(S)
6.0 mm • US size J
YARN
Weight : Bulky, Hobby Lobby Beginner Bee
Beginner Yarn, Green
- <1 skein
Other Yarn Suggestions: Bernat Marker Yarn
NOTIONS
Darning Needle
Scissors
Stitch Marker (if desired)
ABBREVIATIONS
Remember, all of the instructions for these stitches are noted above if you need help!

PATTERN:

FRINGE EDGING:
Cut yarn and pull the end through the final st to tie off.
Use the embroidery needle to weave the ends into the project.
Cut 3-4 inch strands and loop 1-2 pieces through the stitches along two sides to add the fringe.
STITCHED EDGING:
If you’d like a polished edge to your coaster, you can work single crochet stitches around the edge to finish it off. This can be a little tricky as you will need to create your own spaces along the sides. After finishing the last row, do not cut yarn, ch 1 and turn your project.
sc x 15 across the top. In the corner, place 2 sc sts. Now, working along the side, sc x 14. You will need to create your own spaces for your stitches along the side. In the next corner, place 2 sc sts. Working along the bottom, sc x 13. In the next corner, place 2 sc sts. Along the last side, sc x 14. In the final corner, place one sc st in the same space as the first stitch. Cut yarn and pull through the final stitch. Use the tapestry needle to weave the end through the first stitch and secure.
PREFER A VIDEO TUTORIAL?
That’s it! Congratulations on completing your very first crochet project!
If you enjoyed this tutorial, you can find my collection of free patterns in the free pattern library here. Or check out ALL patterns available on Etsy or Ravelry!
To stay up to date with all of my patterns and find special insider savings, become a subscriber! Subscribe to the newsletter to keep up with all the latest! Thank you so much for following along and supporting my designs!