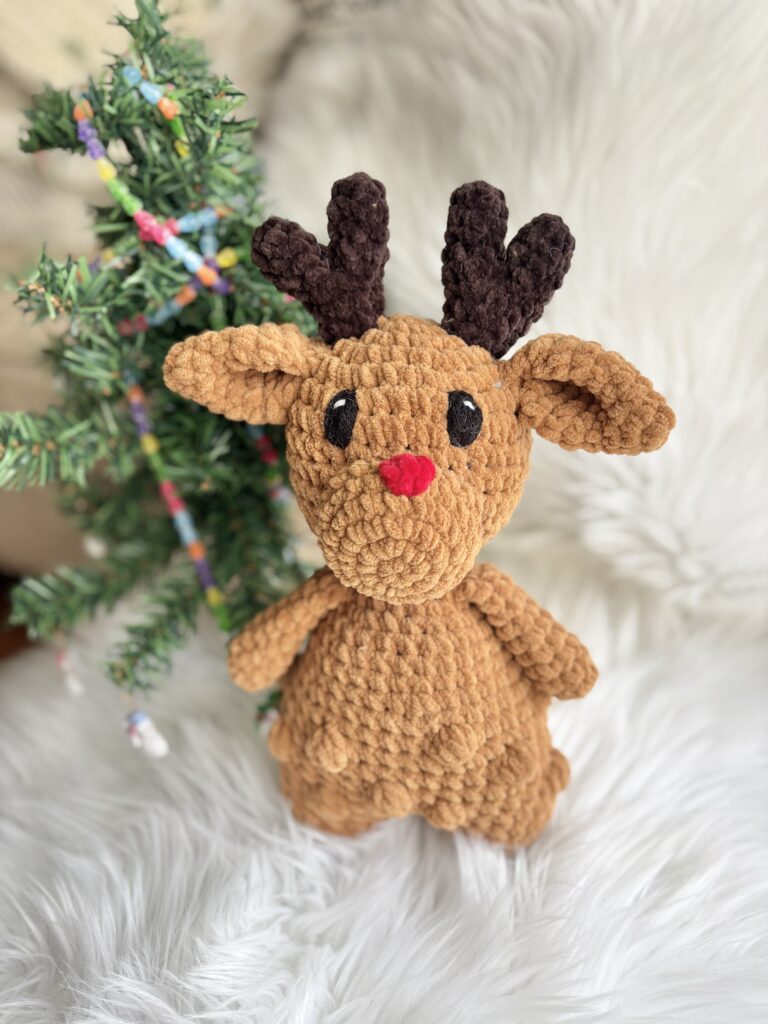
Randy the Reindeer Plush – A FREE Reindeer Crochet Pattern!
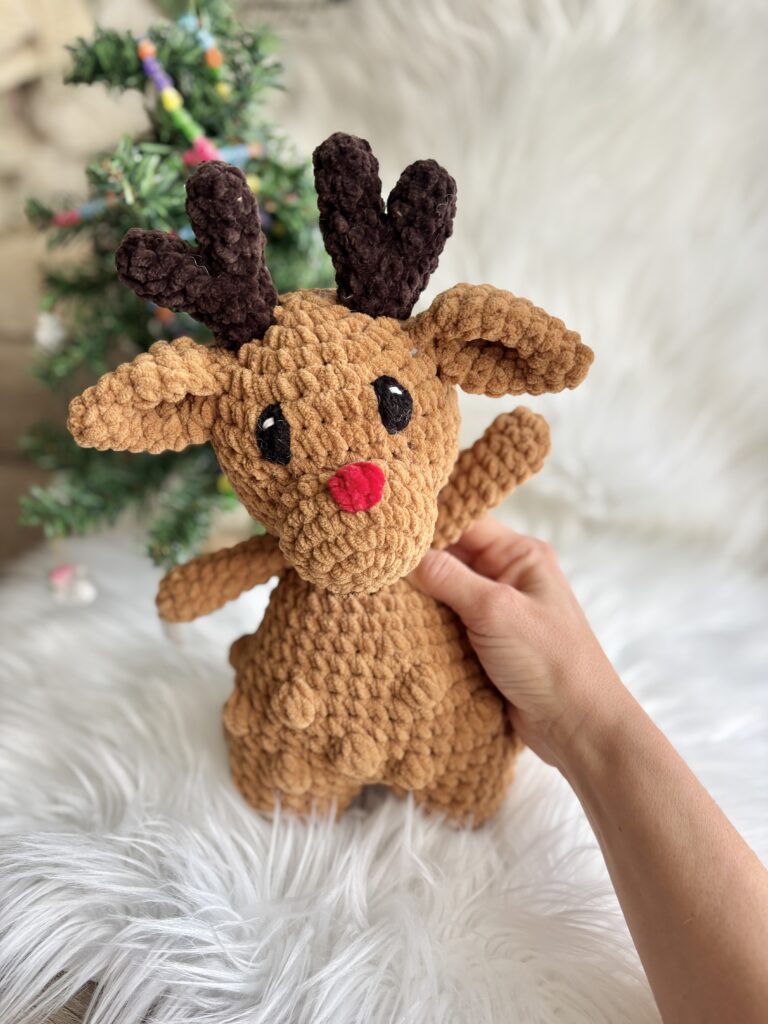
Meet your new snuggly holiday sidekick! From its squishy velvet antlers to its bright little nose and huggable belly, this merry mischief-maker is ready to prance straight off your hook and into the festive fun. Perfect for gifting, decorating or even keeping all to yourself this season 🙂 Check out all the details below for this free reindeer crochet pattern and make a Randy the Reindeer to join in all of your festivities this season.
This plush buddy is made with bulky yarn and simple stitches, making it fun for confident beginners and relaxing for experienced crocheters. This pattern uses optional bobble stitches on the body of the design, to add some extra pops of texture!
If you prefer the ad-free printable version of this plush buddy, you can find it on Etsy or Ravelry. Check out all of the other holiday patterns while you’re there!
Don’t miss a free pattern!
Subscribe to the newsletter to keep up with all the latest!
This pattern was featured in the 2025 Marly Bird 24 Days of Quickies. If you missed the free pdf download, read on to find the pattern below OR grab the ad-free pdf pattern on Etsy or Ravelry!
Here’s a quick note! Most of my patterns use the bobble stitch. This is a unique stitch that creates bobbles which pop up off of the work to add to the texture and overall look of the project. For infants and children, this unique texture creates interest and great sensory input in their toy! I work my bobbles in the round by pushing them towards me rather than away from me so they end up on the outside of the work in the round. If you need help with this technique, see this stitch tutorial and check out this video which gives directions on how to work the bobble stitch in the round. The pattern featured in this video is the free pineapple plush, but the technique used is the same. You can also choose to omit the bobbles in this pattern if you prefer!
MATERIALS:
This free reindeer crochet pattern is designed using bulky plush yarn and a 5.0 mm hook BUT…any yarn should work! Adjust your hook size accordingly for the yarn you plan to use!
Please note: This post contains affiliate links which means that if you purchase through the link, I may receive a small commission at no cost to you. Thank you for supporting my small business
HOOK(S): [My all-time favorite hooks are Clover Amour hooks]
- For Bulky Yarn (Parfait Chunky): 5.0 mm • US size H
YARN: Weight : Bulky Plush
Big Twist, Baby Bear ~ 140 yds in Main Color (tan)
Premier, Parfait Chunky <1 yd in red (bobble nose) // ~ 20 yds in brown (antlers)
NOTIONS:
20 mm safety eyes (if desired)
Darning Needle
Embroidery Thread
Measuring Tape
Polyfil Stuffing
Scissors
Stitch Marker (if desired)
FINAL HEIGHT: ~12 inches
ABBREVIATIONS:
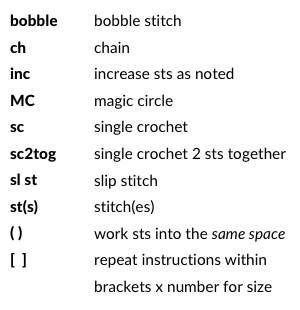
SPECIAL STITCHES:
BOBBLE STITCH (bobble): tutorial here
To make a bobble stitch you will work multiple double crochets into the same stitch.
(Yo, insert hook into st, draw up a loop, yo, pull through first two loops on hook) and repeat 3 more times. End with 5 loops on the hook – yo, pull through all 5 loops.
See this stitch tutorial for a step-by-step description with photos here.
You can choose to make the bobbles on the right or the wrong side of your project, just make sure they are on the outside of the body when finished.
DECREASE STITCHES (hdc2tog/sc2tog): To decrease stitches, you will hdc or sc 2 stitches together to decrease the stitch count. Pattern indicates which stitch to use for these decreases.
INCREASE STITCHES (inc): To increase stitches, you will sc or hdc 2 stitches into the same spot.
COLOR CHANGES: This pattern requires color changes within the body of the work to create the nose for the reindeer. If you need help with bobble color changes, check out this tutorial: https://stuckonyoucrochet.com/how-to-change-colors-on-bobble-stitches/
PATTERN:
MAKING THE ARMS: Make Two
Round 1: To begin, make a magic circle. Place 4 sc in the MC. Do not join. You will continue to work in the round. [4]
Round 2: [sc inc] x 4 around. [8]
Rounds 3-10: sc x 8 around. (64 sts total) [8]
Pinch the top of the arm together and place 4 sc through each side inorder to close off the arm.
Cut yarn, leaving a long tail if you prefer to sew to the body during assembly. Then, tie off and weave in ends. Set aside to attach to the body.
MAKING THE EARS: Make Two
Round 1: Using the main body color yarn, make a magic circle. Place 4 sc in the MC. Do not join. You will continue to work in the round. [4]
Round 2: [sc inc, sc] x 2 around. [6]
Round 3: [sc inc, sc] x 3 around. [9]
Round 4: sc x 9 around. [9]
Round 5: [sc inc, sc x 2] x 3 around. [12]
Round 6: [sc inc, sc] x 6 around. [18]
Rounds 7-8: sc x 18 around. (36 sts total) [18]
Round 9: [sc2tog, sc] x 6 around. [12]
Round 10: Pinch the top of the ear together and place 6 sc through each side in order to close off the ear. [6] Ch 1 and turn. Now fold the closed end of the ear in half. sc x 3 through both sides to give a pinched appearance to the ear. [3]
Leaving a tail to sew to the head, cut and tie off your yarn. Set aside until assembly.
MAKING THE ANTLERS: Make Two
The antlers are made in two parts. Make part a first and then cut yarn and tie off. Make part b next but do not cut yarn upon finishing and move to joining the parts together. Stuff gently as you work.
Round 1a: Using the antler color yarn, make a magic circle. Place 4 sc in the MC. Do not join. You will continue to work in the round. [4]
Round 2a: [sc inc, sc] x 2 around. [6]
Round 3-5a: sc x 6 around. (18 sts total) [6] Cut yarn and tie off. Set aside until joining.
Round 1b: Using the antler color yarn, make a magic circle. Place 4 sc in the MC. Do not join. You will continue to work in the round. [4]
Round 2b: [sc inc, sc] x 2 around. [6]
Round 3-4b: sc x 6 around. (12 sts total) [6] Do NOT cut yarn. Continue to joining.
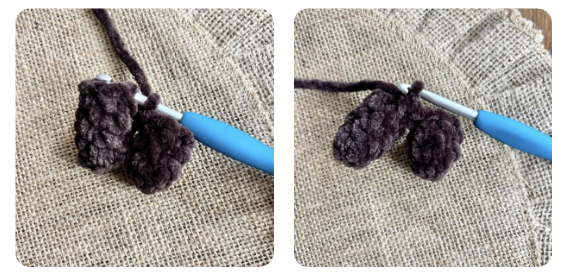
JOINING:
Round 1: Take part an and align next to part b. Working around the sts of part a, sc x 6. Then, continue working around the sts of part b and sc x 6. This should join the two antler pieces together as seen in the photos below. [12]
Round 2: [sc2tog, sc x 2] x 3 around. [9]
Round 3: [sc2tog, sc x 7 around. *For taller antlers, add additional rounds of round 3*
Leaving a tail to sew to the head, cut and tie off your yarn. Set aside until assembly.
MAKING THE MUZZLE:
Round 1: Using the main body color yarn, make a magic circle. Place 6 sc in the MC. Do not join. You will continue to work in the round. [6]
Round 2: [sc inc] x 6 around. [12]
Round 3: [sc inc, sc] x 6 around. [18]
Round 4: sc inc, sc x 8, [sc inc] x 2, sc x 6, sc inc. [22]
In the next round, switch to red on the bobble only to make the nose. See this tutorial for help with color changes on bobble stitches.
Round 5: sc x 5, bobble, sc x 16. [22]
Round 6: sc x 22 around. [22]
Leaving a tail to sew to the face, cut and tie off your yarn. Set aside until assembly.
MAKING THE HEAD:
The head and body are worked in one continuous fashion. Be sure to stuff gently as you work the pattern. Work this portion in the main body yarn color.
Round 1: To begin, make a magic circle. Place 6 sc in the MC. Do not join. You will continue to work in the round. [6]
Round 2: [sc inc] x 6 around. [12]
Round 3: [sc inc, sc] x 6 around. [18]
Round 4: [sc inc, sc x 2] x 6 around. [24]
Round 5: [sc inc, sc x 3] x 6 around. [30]
Round 6: [sc inc, sc x 4] x 6 around. [36]
Rounds 7-11: sc x 36 around. (180 sts total) [36]
*Note: If using safety eyes, add now. If you use safety eyes, you may need to adjust placement for the legs later in the pattern so the eyes on the face remain centered. Keep this in mind when counting stitches later in the pattern. Add safety eyes between rounds 6-7, leaving about 5 sts between them.
Round 12: [sc2tog, sc x 4] x 6 around. [30]
Round 13: [sc2tog, sc x 3] x 6 around. [24]
Round 14: [sc2tog] x 12 around. Stuff the head firmly as you decrease around. [12]
Round 15: sl st loosely in each st around. Do not cut yarn. Continue to body instructions. [12]
MAKING THE BODY:
Continuing from the head, work in the main body color yarn to finish the rest of the body. The body is worked from the neck down. You may choose to crochet the arms into the body OR sew them on after completing the body. You will work the legs on one side and then will need to cut and reattach the yarn to work the other side.
The body includes bobble instructions in rounds 26, 28 and 30. Remember, you may omit the bobbles and replace with sc stitch if desired. You can choose to make the bobbles in the same color or in another color.
Round 16: [sc inc, sc x 3] x 3 around. [15]
Round 17: [sc inc, sc x 4] x 3 around. [18]
Round 18: This round varies depending on if you are crocheting the arms in while working the body OR sewing the wings in after completing the body.
*If sewing the arms on after completing the body, sc x 18 around.
*If crocheting the arms on as you go, sc x 1. Then place the first arm along the side of the body. Working through both the sts of the body and the sts of the arm, sc x 4 to attach the first arm. sc x 5. Then, working through both the sts of the body and the sts of the arm, sc x 4 to attach the second arm. sc x 4. [18]
Round 19: [sc inc, sc x 2] x 6 around. [24]
Round 20: sc x 24 around. [24]
Round 21: [sc inc, sc x 3] x 6 around. [30]
Rounds 22-23: sc x 30 around. (60 sts total) [30]
Round 24: [sc inc, sc x 4] x 6 around. [36]
*Stuff firmly as you continue to work the body.
If you are omitting bobbles, work rounds 27-34 with sc stitch only.
Round 25: sc x 36 around. [36]
Round 26: sc x 2, bobble, [sc x 5, bobble] x 5, sc x 3. [36]
Round 27: sc x 36 around. [36]
Round 28: [sc x 5, bobble] x 6. [36]
Round 29: sc x 36 around. [36]
Round 30: sc x 2, bobble, [sc x 5, bobble] x 5, sc x 3. [36]
Rounds 31-32: sc x 36 around. (72 sts total) [36]
Upon finishing round 32, place a stitch marker (pink st marker, photo A) in the next stitch. Working counter-clockwise with the back side facing up, count 18 sts and place a second st marker (blue st marker, photo B). Work the sts of the legs in between these two st markers. Note: if you used safety eyes or crocheted the arms into the body, you may need to adjust the st markers slightly to keep things centered.
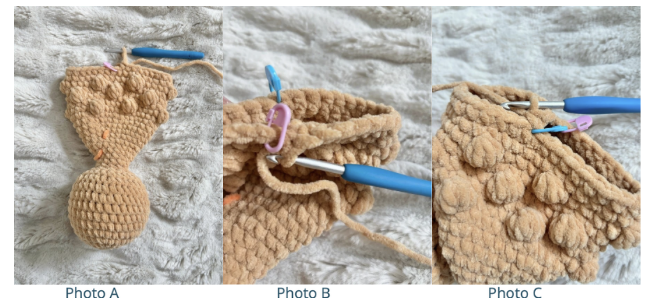
Leg Round 1: Working across the gap in the st next to the blue st marker (photo C), sc x 17. [17]
Leg Round 2: [sc2tog, sc x 2] x 3, sc2tog, sc, sc2tog. [12]
Leg Round 3: [sc2tog, sc x 2] x 3. [9]
Leg Round 4: [sc2tog, sc] x 3. [6] Leaving a tail, cut yarn and tie off.
Use the tail to cinch the stitches of the final round to close off the leg. Weave in ends.
To make the second leg, attach working yarn in the stitch next to the blue stitch marker (photo D). Leave a long tail to sew the gap between the legs together. Now, working across the gap (photo E), repeat leg rounds 1-4 to make the other leg. Be sure to stuff firmly as you go.
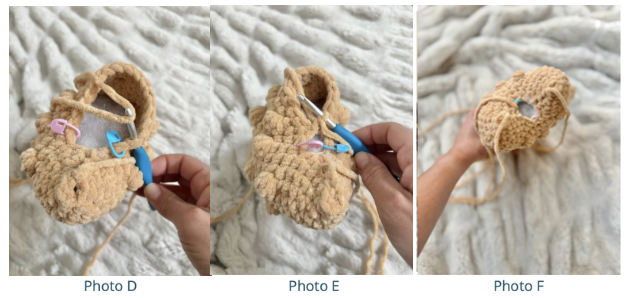
Once both legs are finished and the body has been stuffed firmly, sew the gap between the legs and weave in the ends. See the small gap in between the pink and blue st markers in photo F.
ADDING THE FEATURES:
- Sew the muzzle centered on the face across rounds 9-14. The bobble nose should be centered at the top.
- Embroider the eyes above the muzzle.
- Place the eyes across rounds 6-7, leaving 5 sts between them. Need help with eye embroidery?
- Check out this tutorial.
- Place the eyes across rounds 6-7, leaving 5 sts between them. Need help with eye embroidery?
- Add the ears on either side of the head across rounds 5-6. The face should be centered between.
- Add the antlers centered on top of the head, angled slightly forward. The antlers should be sewn across rounds 2-4 of the head. Use pins for placement first.
- If you did not crochet the arms in, add those now on either side of the neck, 1-2 rounds below the head.

And that’s all! If you make this free reindeer crochet pattern, I’d love for you to share! I hope Randy brings some joy to your holiday season 🙂 And stay tuned for more plush buddies to join the holiday crew! Sneak a peek at some holiday friends below!