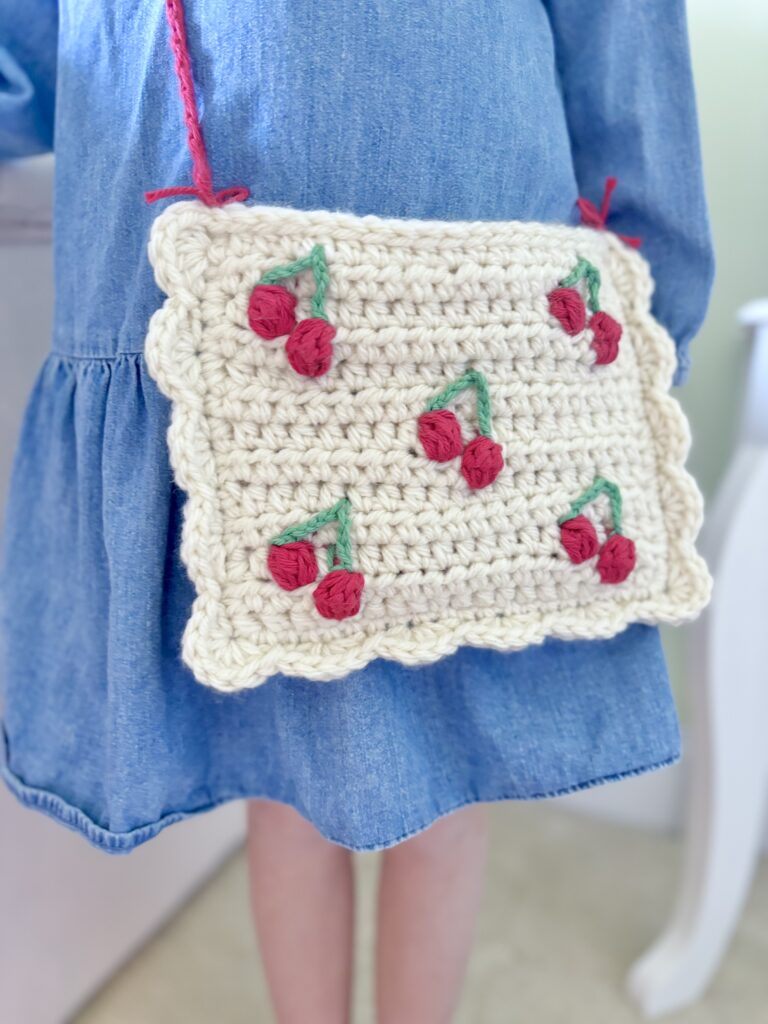
The Sweet Cherry Satchel: A FREE Beginner Friendly Crochet Purse
It may just only be January but while I stay warm and cozied up under the covers, I’m thinking of the breezy spring-filled days ahead. And what better way to pass the time than with a selfish “me” make for spring! The Sweet Cherry Satchel is a quick, easy and FREE beginner-friendly crochet purse. Spruce up your spring wardrobe with this quick purse pattern!
Interested in the ad-free pdf pattern? Find it on Etsy or Ravelry!
This pattern combines simple stitches in a rectanglar shape with slightly more complex stitches to give added texture and dimension. But don’t worry, these complex stitches are absolutely do-able for beginners! This is a free beginner-friendly crochet purse, after all! The pattern includes a written tutorial, photo tutorials and a FULL video tutorial! Scroll to the bottom of this post for the full video tutorial.
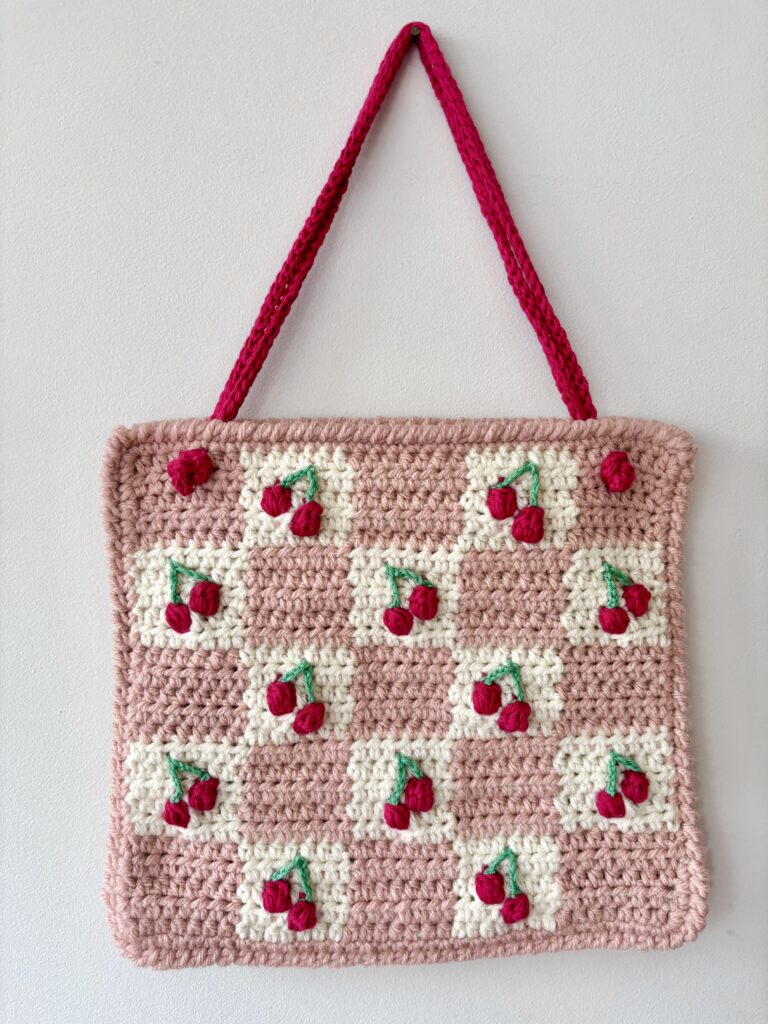
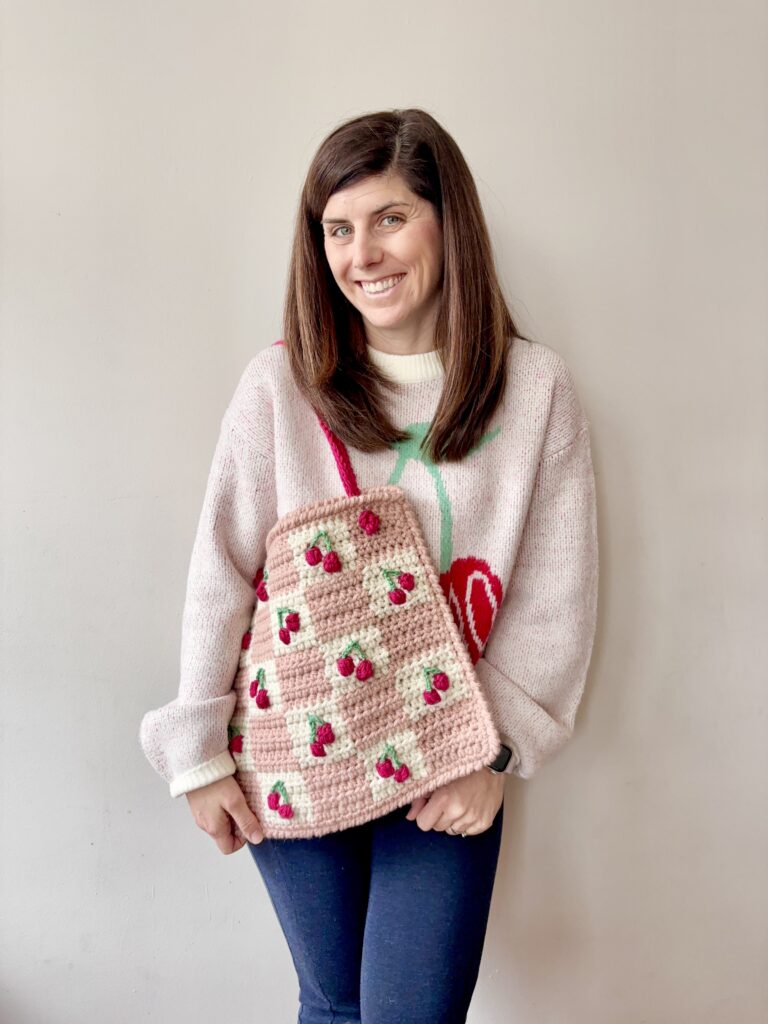
The Sweet Cherry Satchel is part of the Sweet Cherry Collection which also includes the Sweet Cherry Checkered Tote! Featuring a larger design with a checkerboard base, this pattern uses the same sweet cherry motif with a colorful background and larger finished product. If you are interested in checking out the Sweet Cherry Checkered Tote, you can save 20% with the code SWEETCHERRY on either pattern on Etsy or Ravelry! Or shop the bundle for a discounted price on both patterns!

Don’t miss a free pattern! Subscribe to the
newsletter to keep up with all the latest!
This pattern uses bulky weight yarn for the main color and worsted weight cotton, held double-stranded for the cherries. The different types of yarn texture add to the uniqueness of this fruity design. The pattern adds a fun touch to any outfit, while being practical enough for daily use!
I’d love to have you share your project with me on Instagram or Facebook. Make sure to tag @_stuckonyoucrochet_ on Instagram or Stuck on You Crochet on Facebook if you’d like to share your project!
Please note: This post contains affiliate links which means that if you purchase through the link, I may receive a small commission at no cost to you. Thank you for supporting my small business!

BLOG HOP:
This free beginner-friendly crochet purse pattern is being shared as part of the Underground Crafter 2026 “Gift to Myself” Crochet Along! After the holiday rush who better than yourself to spend some time on a few selfish makes! Use this month to treat yo’self with this wonderful round up of FREE patterns. Find the full lineup of patterns and special prizes here!
Please note, the free pdf download for this pattern has ended. Thanks for you support!
MATERIALS:
HOOK(S): [My all-time favorite hooks are Clover Amour hooks]
*If you’d like a slightly larger diameter for your coaster, use a larger hook size!
YARN:
Weight: Bulky, Size 5 Lion Brand, Hue and Me
Color A: Salt, ~85 yards
Weight: Worsted, Hobby Lobby, I Love This Cotton Yarn
Color B: Red, ~25 yards (held double stranded)
Color C: Green, <5 yards (held single stranded)
*Use bulky weight yarn for the satchel. Sample uses double stranded cotton for the cherries. For a toddler size, try out the satchel in single strand worsted or cotton yarn!
NOTIONS:
- Darning Needle
- Measuring Tape
- Scissors
- Stitch Marker (if desired)
FINAL SIZE
Diameter: ~7.5″ long x 9.5″ wide
OK, Let’s Get Started!

STITCH ABBREVIATIONS:

SPECIAL STITCHES:
BOBBLE STITCH (bobble):
To make a bobble stitch, work four double crochets into the same stitch as below:
(Yo, insert hook into st, draw up a loop, yo, pull through first two loops on hook) and repeat 3 more times. End with 5 loops on the hook – yo, pull through all 5 loops.
See this stitch tutorial for a step-by-step description with photos HERE.
You will need to be comfortable with working the bobbles on BOTH sides of the work. When working the odd rows (right side up), push bobbles towards you. When working the even rows (wrong side up), push bobbles away from you.
For help with changing colors on bobbles, see this tutorial HERE.
STITCH GRAPH:
The stitch graph gives a visual of the front panel. Odd rows are right side up, worked from right to left. Even rows are wrong side up, worked from left to right.

PATTERN:
MAKING THE FRONT PANEL:
Use a 6.0 mm hook. Use Color A (Hue and Me, Salt) and Color B (ILTY Cotton, Red). TWO strands of cotton yarn are used for the cherries as this yarn is size 4, not size 5 yarn. Remember, odd rows are right side up with bobbles worked towards you while even rows are wrong side up with bobbles worked away from you.
Before beginning, cut 5 strands of your cherry color yarn to ~48″ long. For yarn held double stranded, cut 10 strands. These will become the cherry bobbles on the front panel. One strand (or two, if held double stranded) will be used to work two bobbles – use the working yarn from the first bobble to make the second, when you work along the next row.

To begin, ch 20. (Chain should measure about 7″ unstretched).
Row 1: Starting in the second ch from the hook, hdc x 19. ch 1 and turn. [19]
Row 2: hdc x 3, bobble, hdc x 11, bobble, hdc x 3. ch 1 and turn. [19, 2 bobbles]
Row 3: hdc x 4, bobble, hdc x 11, bobble, hdc x 2. ch 1 and turn. [19, 2 bobbles]
Rows 4-5: hdc x 19. ch 1 and turn. (2 rows) [19]
Row 6: hdc x 9, bobble, hdc x 9. ch 1 and turn. [19, 1 bobble]
Row 7: hdc x 10, bobble, hdc x 8. ch 1 and turn. [19, 1 bobble]
Rows 8-9: hdc x 19. ch 1 and turn. (2 rows) [19]
Row 10: hdc x 3, bobble, hdc x 11, bobble, hdc x 3. ch 1 and turn. [19, 2 bobbles]
Row 11: hdc x 4, bobble, hdc x 11, bobble, hdc x 2. ch 1 and turn. [19, 2 bobbles]
Rows 12-13: hdc x 19. ch 1 and turn. At the end of row 13, do not ch 1 or turn. (2 rows) [19]
Cut yarn, tie off and weave in ends. Add stems to the cherries and then set aside for joining.
ADDING THE STEMS:
To add the stems, use Color C (ILTY Cotton, Red) and a 3.5 mm hook. A single strand of worsted weight yarn is used here to make the stems a little thinner. Embroider the stems to the cherries before joining to make weaving the ends a little easier than adding afterwards.
The stems are worked as chains on top of the bobble. Use 4-5 chains for each stem. Start on either cherry – work 4 chains for the higher cherry and 5 chains for the lower cherry.

MAKING THE BACK PANEL:
Use a 6.0 mm hook. The back panel is made in a single color. You’ll need Color A.

Row 1: To begin, ch 20. Starting in the second ch from the hook, hdc x 19. ch 1 and turn. [19]
Rows 2-13 hdc x 19. ch 1 and turn. At the end of row 13, do not turn. (12 rows) [19]
Ch 1 and move onto joining instructions. Do NOT cut yarn.
JOINING AND EDGING THE PANELS:
The satchel is joined by crocheting the edges of the front and back panel together. Work the stitches of the joining round through BOTH the panels to connect them.
Work the joining and edging in Color A or color desired. Use a 6.0 mm hook. Place the front panel, right side up, on top of the back panel. Working yarn from the back panel should be in the top left corner.
JOINING:
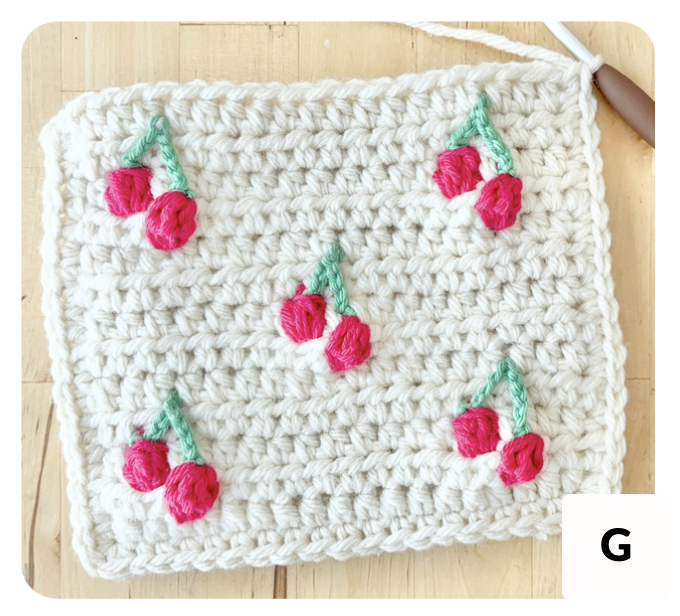
– Working down the left side of the panels, through both the front and back, sc x 17.
– When reaching the corner, place 3 sc stitches in the same corner stitch.
– Now, work along the bottom of the panels and sc x 17.
– Place 3 sc stitches in the corner.
– Work along the right side of the panels, sc x 17. (Photo G)
Ending stitch should be in the top right corner, near the satchel opening. Do not cut yarn. Continue to the edging.
EDGING:
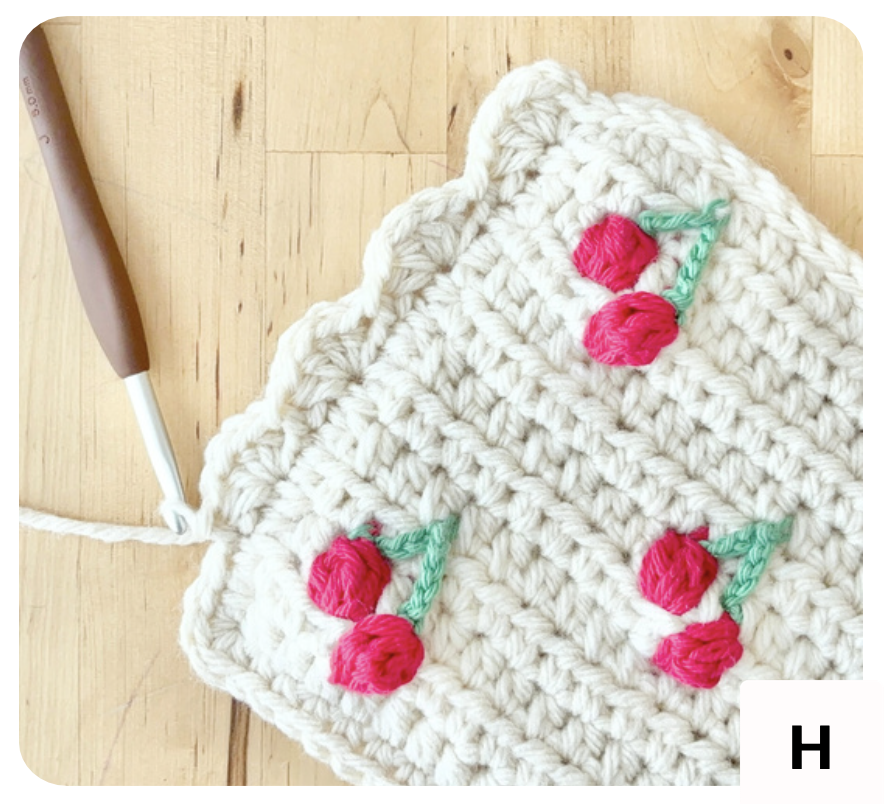
Ch 1. Working along the top of the front panel only, sl st x 19. Sl st to the first st of the joining round in the left corner. Ch 1.
Now, work shells along the sides of the satchel. Shells will be worked into the stitches that connected the panels in the joining rounds. For the first shell, sk the st where the sl st was placed.
– Working along the left side, [sk 1 st, 4 hdc in the same st, sk 1 st, sl st] x 4. sk 2 sts, 6 hdc in the same corner st, sk 1 st, sl st. (Photo H)
– Working along the bottom, [sk 1 st, 4 hdc in the same st, sk 1 st, sl st] x 4. sk 1 st, 6 hdc in the same corner st, sk 2 sts, sl st.
– Working along the right side, [sk 1 st, 4 hdc in the same st, sk 1 st, sl st] x 4.
End in the top right corner. ch 1 and sl st x 19 across the back panel. Cut yarn, tie off and weave in ends.
ADDING A STRAP:
Adding a strap is optional as this design looks adorable as a handheld bag! However, if you’d like to add a strap, use a 6.0 mm hook and one strand of bulky yarn or two strands of worsted yarn to make a strap for the satchel.
Strap can be customized to desired length. For a short, shoulder length strap, attach strap color yarn to the top left corner with a slip stitch. ch 75 or until chain measures about 26″ (adjust chains for longer or shorter length). sl st through the top right corner to join. Cut yarn, tie off and weave in ends.
Voila! Enjoy your new purse 🙂
If you are a visual learner and need more help with this design, check out the full YouTube Tutorial HERE!

I hope you enjoyed this free beginner-friendly crochet purse and love your new Sweet Cherry Satchel design. I’d love to have you follow along for other pattern tips and new designs! Subscribe to the newsletter to keep up with all the latest! You can also follow along on Instagram or Facebook. Make sure to tag @_stuckonyoucrochet_ on Instagram or Stuck on You Crochet on Facebook if you’d like to share your project!
Please note: this design is for the private use of Allie Wasserman and Stuck on You Crochet. Digital copies may not be altered, rewritten, shared or sold in any way. Thanks for supporting my design!