So! You want to Learn to Crochet :)
You’ve thought about it for ages…HOW is it possible that there are people who can pick up one skein of yarn and one hook and turn it into something adorable!? If you’ve had that itch to get started, you’re in the right place. In this beginner tutorial, we will go over all of the steps needed to learn to crochet! We will learn the tools necessary for crocheting, types of yarn to choose from and a few beginning techniques and stitches that can be used in making a two beginner projects!


The word crochet derives from the French word “crochet” meaning “hook.” The art form has been around for many hundreds of years! Crocheters use a skein of yarn and one crochet hook, interlooping the yarn to create the project. You can find crochet patterns for blankets, scarves, mittens, toys, stuffed animals, sweaters, outfits and more. You name it, you probably can find a pattern for it!
Find the Beginner Scarf Pattern HERE
Find the Beginner Coaster Pattern HERE
Interested in taking a look at some of my other patterns? Check them out on Etsy or Ravelry!
SO, how do you even get started when you want to learn to crochet? It can be a bit overwhelming at first. How does one pick the right hook? What about all of the different yarn options? How the heck do you hold everything? In this learn to crochet tutorial, we’ll go over the tools of the trade, three beginner techniques (making a slip knot, making a chain and the single crochet stitch) and then we’ll be ready to work our beginner patterns.
Please note, this post contains affiliate links. By clicking these links, I may receive a small commission at no cost to you. Thanks for supporting my small business!
Let’s get started!
TOOLS OF THE TRADE
There’s a lot to learn before you even pick up a hook when learning to crochet! Crochet uses one tool, called a ‘hook’ and then a skein of yarn. Hooks and yarns come in all sizes to give a different look and feel to your finished crochet project. The hook you use will typically correlate to the type and size of yarn used. Typically, smaller hook sizes are used for thinner yarns and larger hook are be used for thicker yarns.
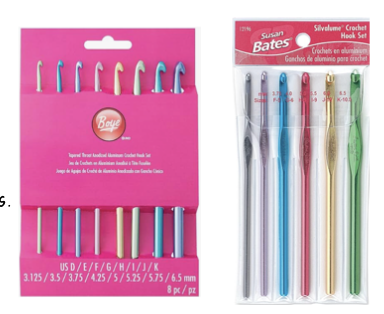
Hooks come in all sizes and shapes! They can be made in many different types of materials including plastic, aluminum, wood or steel. They may be ergonomic with soft or rounded handles or have specialized grips to make crocheting more comfortable. They may have an inline hook or a tapered hook. Sizing is measured in the US by letter system but also by mm according to the metric system. There are still even MORE standards used in different parts of the world. Most hook companies will list both the letter and metric system label for sizing. See the chart on the next page for an overview of hook sizes!
Many beginner crocheters prefer to start with a set of aluminum hooks as they are cost-efficient and well made. They are easy to find and sturdy for beginners. Susan Bates or Boye hooks are both well-respected brands that come in a range of sizes.
Some crocheters prefer to work with ergonomic hooks to have a bit of a thicker handle and grip. These can be easier to work with for longer periods of time and can help prevent hand cramping. Some of my all-time favorite ergonomic hooks to work with are Clover brand hooks found here. Personally, these have become my favorite type of hook to use!

Aside from these aluminum and ergonomic hooks, there are also many other hook types. Wooden hooks made with bamboo or other materials are popular as well as luxury hooks such as Furls Crochet. There are niche hook designers who create themed hooks for added fun as well! Once you get to know the type of hook you prefer, you can really branch out into all of the options available!
CHOOSING A HOOK SIZE
So, now that you know the different types of hook, how do you choose just one? And which size is the right size? Below, we’ll review “reading a yarn label.” Based on the type of yarn you choose for a project, the hook size will typically be recommended right on the label. If you are working from a written crochet pattern, you will also typically see a hook size recommended in the instructions.
You may come to find that your tension (the way that you hold the yarn and the tightness of your stitches) varies from the standard. If you have tighter than typical tension, you may wish to use a larger hook size than recommended. If you have looser than typical tension, you may wish to use a smaller hook size than recommended.
Check out this Crochet Hook Conversion Chart below from Hobbii Yarns to see the different sizes.

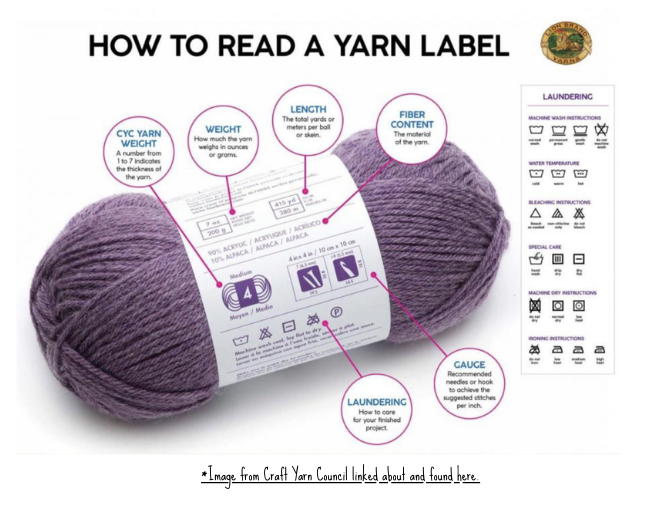
READING A YARN LABEL
Just like hooks, yarn comes in many different sizes and textures. Yarn size is measured in “weight,” ranging from size “0” to size “7.” The larger the number, the thicker the yarn.Generally, the smaller yarn weights will use smaller size hooks and the larger weights will use larger hooks.
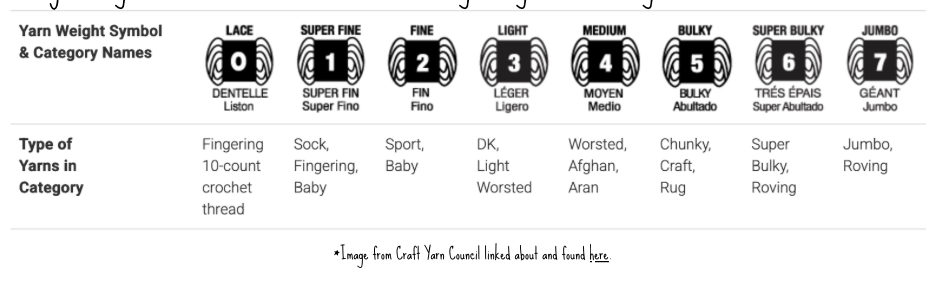
Understanding how to read a yarn label and what all of the symbols and information means, is essential to figuring out which yarn and hook will be best for your project. Below is an image from the Craft Yarn Council website with improtant information found on yarn labels. The Craft Yarn Council has an excellent tutorial for reading yarn labels linked here.
SO…WHAT SHOULD I USE?
For this beginner learn to crochet tutorial, I recommend starting with a Super Bulky Size 6 yarn and a 7 or 8 mm hook for the scarf pattern OR a bulky beginner yarn and a 6 mm hook for the coaster pattern. The thicker yarn and larger crochet hook will be a little easier to hold and visualize your stitches than some of the smaller hooks and yarn. That being said, you do not want to choose a super textured or “fluffy” super bulky yarn. Choosing a textured yarn will make it harder to visualize your stitches and may be frustrating to work with as a beginner.
Once you have your project, your hook and your yarn, you are ready to get started! Choose your pattern below to find the specific steps. The beginning steps and basic stitches are the SAME for the both patterns. Feel free to work up one and then try another!
BEGINNER SCARF PATTERN HERE
BEGINNER COASTER PATTERN HERE
To stay up to date with all of my patterns and find special insider savings, become a subscriber! Subscribe to the newsletter to keep up with all the latest! Thank you so much for following along and supporting my designs!